Demystifying Flutter Architecture: Understanding iOS Menu System Through a Restaurant Metaphor
Let’s use a restaurant kitchen metaphor to understand how Flutter’s menu system works, specifically the complex interactions between iOS app, Framework, and Engine! — Inspired by Justin and Huan
Who is this for? This article is for Flutter developers (from beginners to intermediate) who want to understand how Flutter works under the hood, especially the interaction between Framework and Engine layers.
💡 Building your own Flutter Engine? Check out my guide: Your First Step to Contributing: Building Flutter Engine and Framework Development
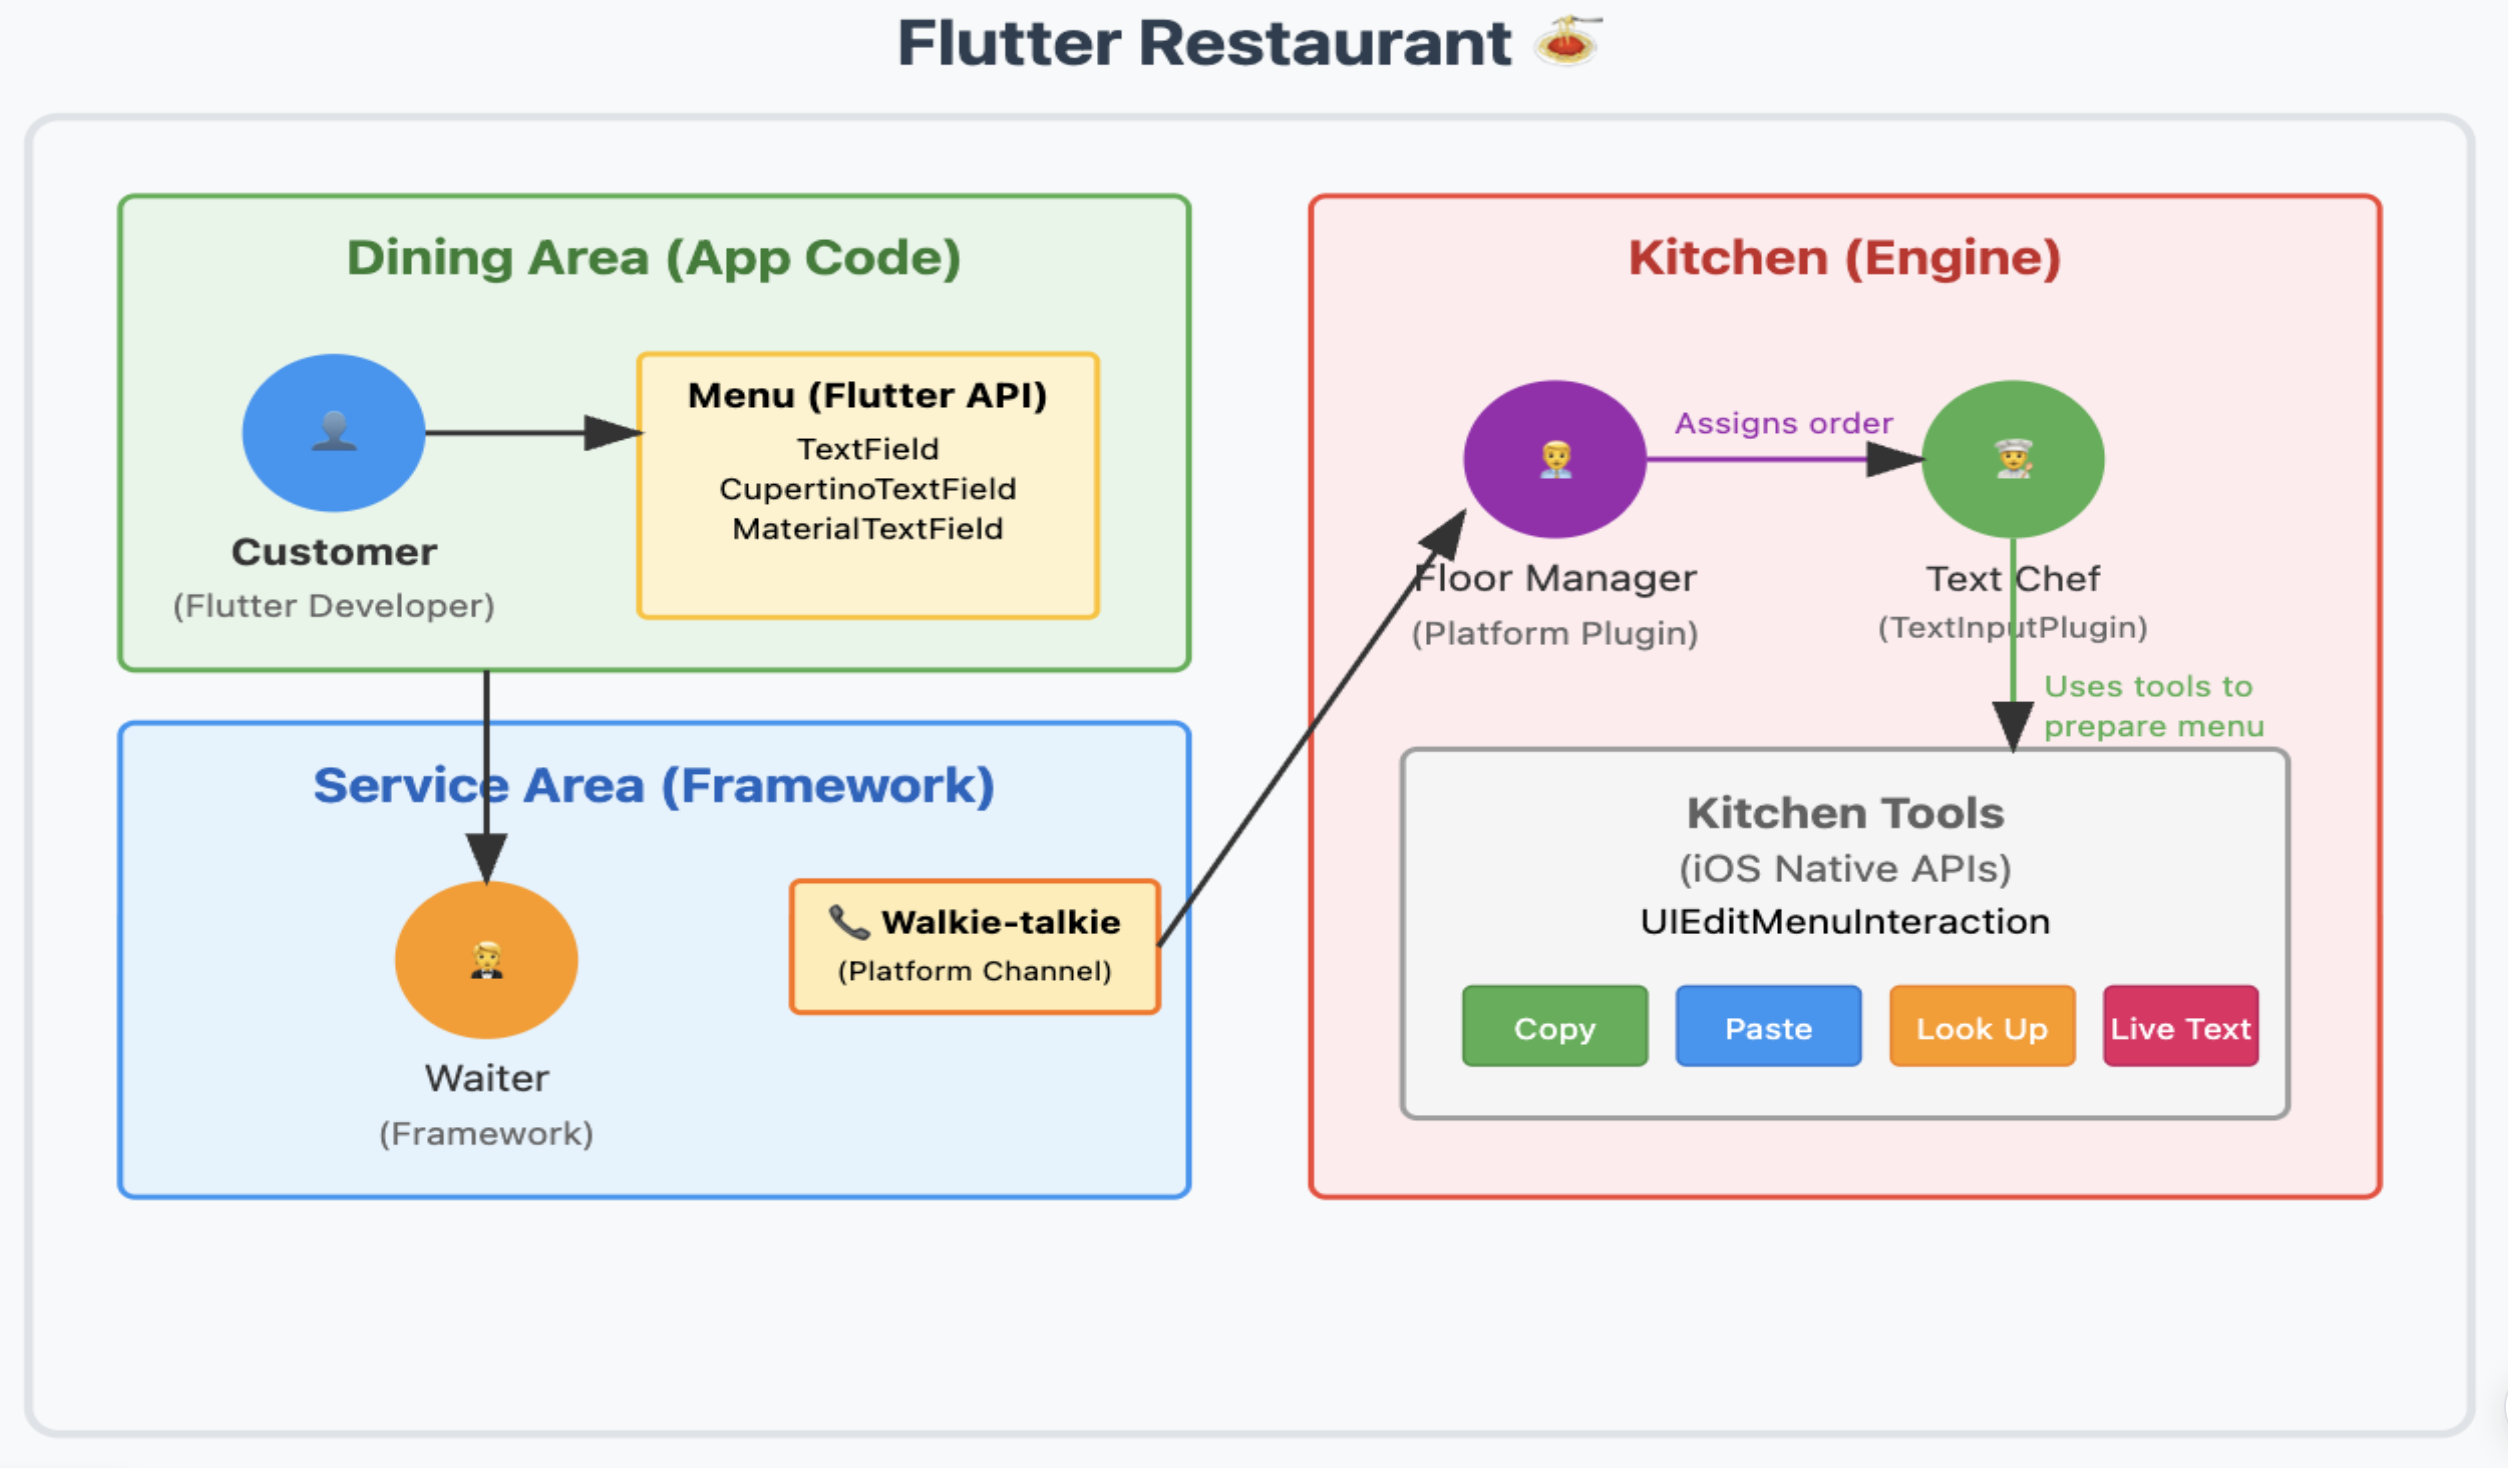
Think about what happens when we walk into a restaurant and enjoy a delicious meal. Right, as customers we need to order food, the waiter records our request and passes it to the kitchen, the kitchen receives the order and delegates it to the appropriate chef based on the dish type! Once the chef finishes cooking, we get to enjoy our meal! So let’s imagine Flutter’s process works like ordering food at a restaurant!
Customer (iOS Developer) orders → Waiter (Framework) takes the order → Kitchen (Engine) cooks → Customer enjoys the meal (System Menu)
The Architecture Flow
Here’s a visual representation of how the system works:
[iOS App Developer]
    ↓ (uses TextField/CupertinoTextField)
[Flutter Framework - Dart]
    ↓ (Platform Channel: "ContextMenu.showSystemContextMenu")
[Flutter Engine - Objective-C]
    ↓ (FlutterPlatformPlugin.mm → FlutterTextInputPlugin.mm)
[iOS Native System Menu]
    ↓ (UIEditMenuInteraction - iOS 16.0+)
[User sees the menu!]
Step 1: Customer Places Order (iOS App Development Layer)
Most developers use TextField or CupertinoTextField to create editable text fields. But under the hood, both of these widgets rely on a core component: EditableText.
Developers can customize the menu that pops up after long-pressing a text field through properties like TextField.contextMenuBuilder or CupertinoTextField.contextMenuBuilder. It’s like a customer telling the waiter: “I don’t want the default meal! I want to customize my order!”
On iOS, if developers don’t customize the menu, TextField defaults to using a built-in menu called SystemContextMenu. Its job is very specific - just taking orders. It doesn’t cook the menu itself, it’s just a messenger. It’s like the customer telling the waiter: “Hey, I’ll just take the default menu, let the iOS kitchen prepare a standard native menu!”
Step 2: Waiter Takes Order and Passes to Kitchen (From Framework to Engine)
Now the “waiter” (Framework) has received the instruction to “show native menu”. They need to accurately convey this instruction to the “kitchen” (Engine). This communication process uses a tool called Platform Channels (Flutter’s mechanism for Dart-native communication). Think of it as a walkie-talkie, specifically managed by text_input.dart, for communication between Dart code (in Framework) and native code (Objective-C, in Engine).
SystemContextMenuuses a controller calledSystemContextMenuController(manages native iOS menu display)- Through platform channels, it sends a message named
"ContextMenu.showSystemContextMenu"
This message is like the waiter shouting into the walkie-talkie: “Table 7 wants the Hot-Dry noodles!”
Step 3: Kitchen Prepares the Dish (Engine Layer)
Now the message reaches the “kitchen floor manager” through the walkie-talkie — FlutterPlatformPlugin.mm, which is the “first stop” in the engine for receiving all platform messages. It’s super busy, receiving all kinds of instructions (not just text-related). When it receives an instruction, it figures out which “chef” should handle it.
When it hears "ContextMenu.showSystemContextMenu", it knows to pass this task to the chef specialized in text input: Head Text Chef: FlutterTextInputPlugin.mm, the expert who handles all “text input” related work.
Inside FlutterTextInputPlugin.mm, there’s a crucial part. It decides which buttons should appear on the final menu based on the current state. For example, the Lookup button: View source code
Real Kitchen Story: Adding a New Dish (Live Text) to the Menu
Let me share a real story from the Flutter kitchen! Just like how a popular dish might disappear from a restaurant menu and customers complain, iOS users noticed that the Live Text option (a feature that lets you extract text from images) disappeared from text field menus after a Flutter update.
The Problem: Missing Dish on the Menu
In PR #170969, I had to add the Live Text option back to the iOS system context menu. It’s like customers saying: “Hey, where did my favorite Live Text dish go? We want it back!”
The Solution: Recipe Development
Just like adding a new dish requires coordination between the dining room and kitchen, here’s how I fixed it:
1. Update the Menu (Framework Side)
Now here’s where it gets interesting! Adding Live Text to our restaurant menu isn’t as simple as just writing it on the board. We need two special cards - think of them like a fancy restaurant that has both a display menu and order cards!
The Recipe Card (in text_input.dart):
// This is like the recipe card the kitchen needs to know how to make the dish
final class IOSSystemContextMenuItemDataLiveText extends IOSSystemContextMenuItemData {
  const IOSSystemContextMenuItemDataLiveText();

  @override
  String get _jsonType => 'captureTextFromCamera';
  // This is the "dish code" - tells the kitchen exactly what to cook!
}
The Menu Display Card (in system_context_menu.dart):
// This is what the customer sees on the menu
final class IOSSystemContextMenuItemLiveText extends IOSSystemContextMenuItem {
  const IOSSystemContextMenuItemLiveText();

  @override
  IOSSystemContextMenuItemData getData(WidgetsLocalizations localizations) {
    return const IOSSystemContextMenuItemDataLiveText();
    // When ordered, hand over the recipe card to the kitchen!
  }
}
Why two cards? Well, it’s like having a beautiful menu photo for customers (the widget) and a detailed recipe for the chef (the data). The magic happens when:
- The customer points at the menu item (widget shows Live Text option)
- The waiter takes the order and clips the recipe card to it (getData returns the data object)
- The kitchen sees the dish code
'captureTextFromCamera'and knows exactly what to prepare!
2. Kitchen Preparation (Engine Side)
Time to head into the kitchen! Our head chef (FlutterTextInputPlugin.mm) needs to learn this new recipe. But wait - there’s a twist! The chef needs to check their iOS cookbook version first (spoiler: Live Text only appears in cookbook version 15.0 and up!).
Teaching the Chef the New Recipe:
// Chef checks the order ticket for our special dish code
if ([type isEqualToString:@"captureTextFromCamera"]) {
    if (@available(iOS 15.0, *)) {
        // "Ah yes, I know this dish! Let me add it to today's specials"
        [self addBasicEditingCommandToItems:items
            type:type
            selector:@selector(captureTextFromCamera:)
            suggestedMenu:suggestedMenu];
    }
    // If cookbook is too old: "Sorry, we don't have that recipe yet!"
}
Chef’s Capability Check:
// Customer asks: "Can you make Live Text?" Chef checks their skills!
- (BOOL)canPerformAction:(SEL)action withSender:(id)sender {
    if (action == @selector(captureTextFromCamera:)) {
        if (@available(iOS 15.0, *)) {
            return YES;  // "Yes! I learned that in iOS cookbook 15.0!"
        }
        return NO;  // "Sorry, my cookbook is too old for that dish"
    }
    return [super canPerformAction:action withSender:sender];
}
See that @"captureTextFromCamera" string? That’s our dish code from the recipe card! It’s like magic:
- The waiter shouts into the kitchen: “Order for dish code ‘captureTextFromCamera’!”
- The chef hears it and thinks: “Ah, that’s the iOS special
@selector(captureTextFromCamera:)!” - But first, chef checks the cookbook version - “iOS 15.0 or newer? Good to go!”
3. Serving the Dish
The beauty of this fix? Once both the Framework (waiter) and Engine (kitchen) knew about Live Text, iOS users could once again enjoy this feature in their text field menus!
And that’s how we brought Live Text back to the menu! But hold on - our restaurant story isn’t over yet…
Bonus: What Happens When Users Click? (The Reverse Process)
This is where the story gets really interesting! The reverse process shows how user actions flow back through our restaurant.
Flutter Input Field Clicks
When you click on a Flutter input field, this event stays entirely in the Dart world - the Flutter Framework handles it directly without needing to go to the native kitchen.
Native Menu Button Clicks
But when you click a native menu button (like “Copy” or “Look Up”), something different happens:
-
iOS Captures First: The menu is actually a native
UIEditMenuInteractionelement drawn by iOS itself, not by Flutter. So iOS captures the click event first - it’s like the customer directly telling the kitchen staff what they want, bypassing the waiter! -
Kitchen Notifies the Waiter: iOS then uses a callback mechanism to notify our “head text chef” (
FlutterTextInputPlugin.mm): “Hey, the customer at table 7 just ordered the ‘Look Up’ special!” -
Engine Processes: The FlutterTextInputPlugin receives this callback and translates it into an action Flutter can understand.
-
Back to Framework: Finally, the Engine sends a message back through Platform Channels to the Framework, which then updates your app’s state.
This completes the entire interaction loop - from customer order to kitchen preparation to serving the final dish!
Behind the Kitchen Doors: Finding Your Way Around
Now that you’ve seen how our Flutter restaurant operates, you might be thinking: “This is great, but how do I find my way around this massive kitchen?” Don’t worry - I’ve got some chef’s secrets to share!
Practical Tips: How to Find These Files?
You don’t need to memorize full filenames. You need to learn how to deduce and search.
Deduction
- “My problem is related to text input on iOS…”
iOS→ Maps to.../platform/darwin/ios/...in engine code directoryText Input→ Filename definitely containsTextInput- Combine them: Search for
TextInputin theiosdirectory, and you’ll immediately findFlutterTextInputPlugin.mm
Search
This is every developer’s superpower!
- Search by function: Search for
"Look Up"string in the entire Flutter Engine code, you’ll find it inFlutterTextInputPlugin.mm, thus locating the “head text chef” - Search by channel name: Search for
"ContextMenu.showSystemContextMenu"message name in the code, you’ll find both sender (text_input.dart) and receiver (FlutterPlatformPlugin.mm)
Learn to Trace the Source
This is a more advanced technique. In your IDE, use “global search” on a method name (like showSystemContextMenu) to find related files.
You can jump from an Engine method step by step to see who calls it, tracing all the way back to the Framework layer. Or vice versa. This helps you build a complete view of the call chain.
The Complete Live Text Dining Experience
Why all this complexity? Well, it’s like running a restaurant that serves both local dishes (iOS native features) and international cuisine (cross-platform Flutter features). The restaurant (your app) needs to:
- Keep the menu flexible (Framework stays platform-agnostic)
- Let specialized chefs handle local dishes (Engine handles iOS-specific stuff)
- Use a good communication system (Platform Channels as the walkie-talkie)
- Have clear dish codes (those
_jsonTypestrings are the universal language!)
Deep Understanding
FlutterTextInputPlugin.mm is Flutter Engine’s “diplomat” stationed on the iOS platform. While it works for Flutter Engine, it must use iOS native code as the “local language” to communicate effectively with the operating system.
Your app is built using Flutter’s official Dart building blocks (Framework), and both the blocks and the model are made of Dart.
Just a fair warning, understanding this architecture takes time (think weeks, not hours), but once you get it, you’ll be cooking up Flutter contributions like a master chef! So pour yourself some coffee, dive into the code, and enjoy the journey. Trust me, it gets easier after the first few PRs!
Related Articles
Want to build your own Flutter Engine? Check out: Your First Step to Contributing: Building Flutter Engine and Framework Development
License
This article is licensed under CC BY-NC-ND 4.0
💡 Found this helpful? Follow me on GitHub and share this article with your Flutter community!